> ## Documentation Index
> Fetch the complete documentation index at: https://docs.chainlit.io/llms.txt
> Use this file to discover all available pages before exploring further.
# Discord
To make your Chainlit app available on Discord, you will need to create a Discord app and set up the necessary environment variables.
## How it Works
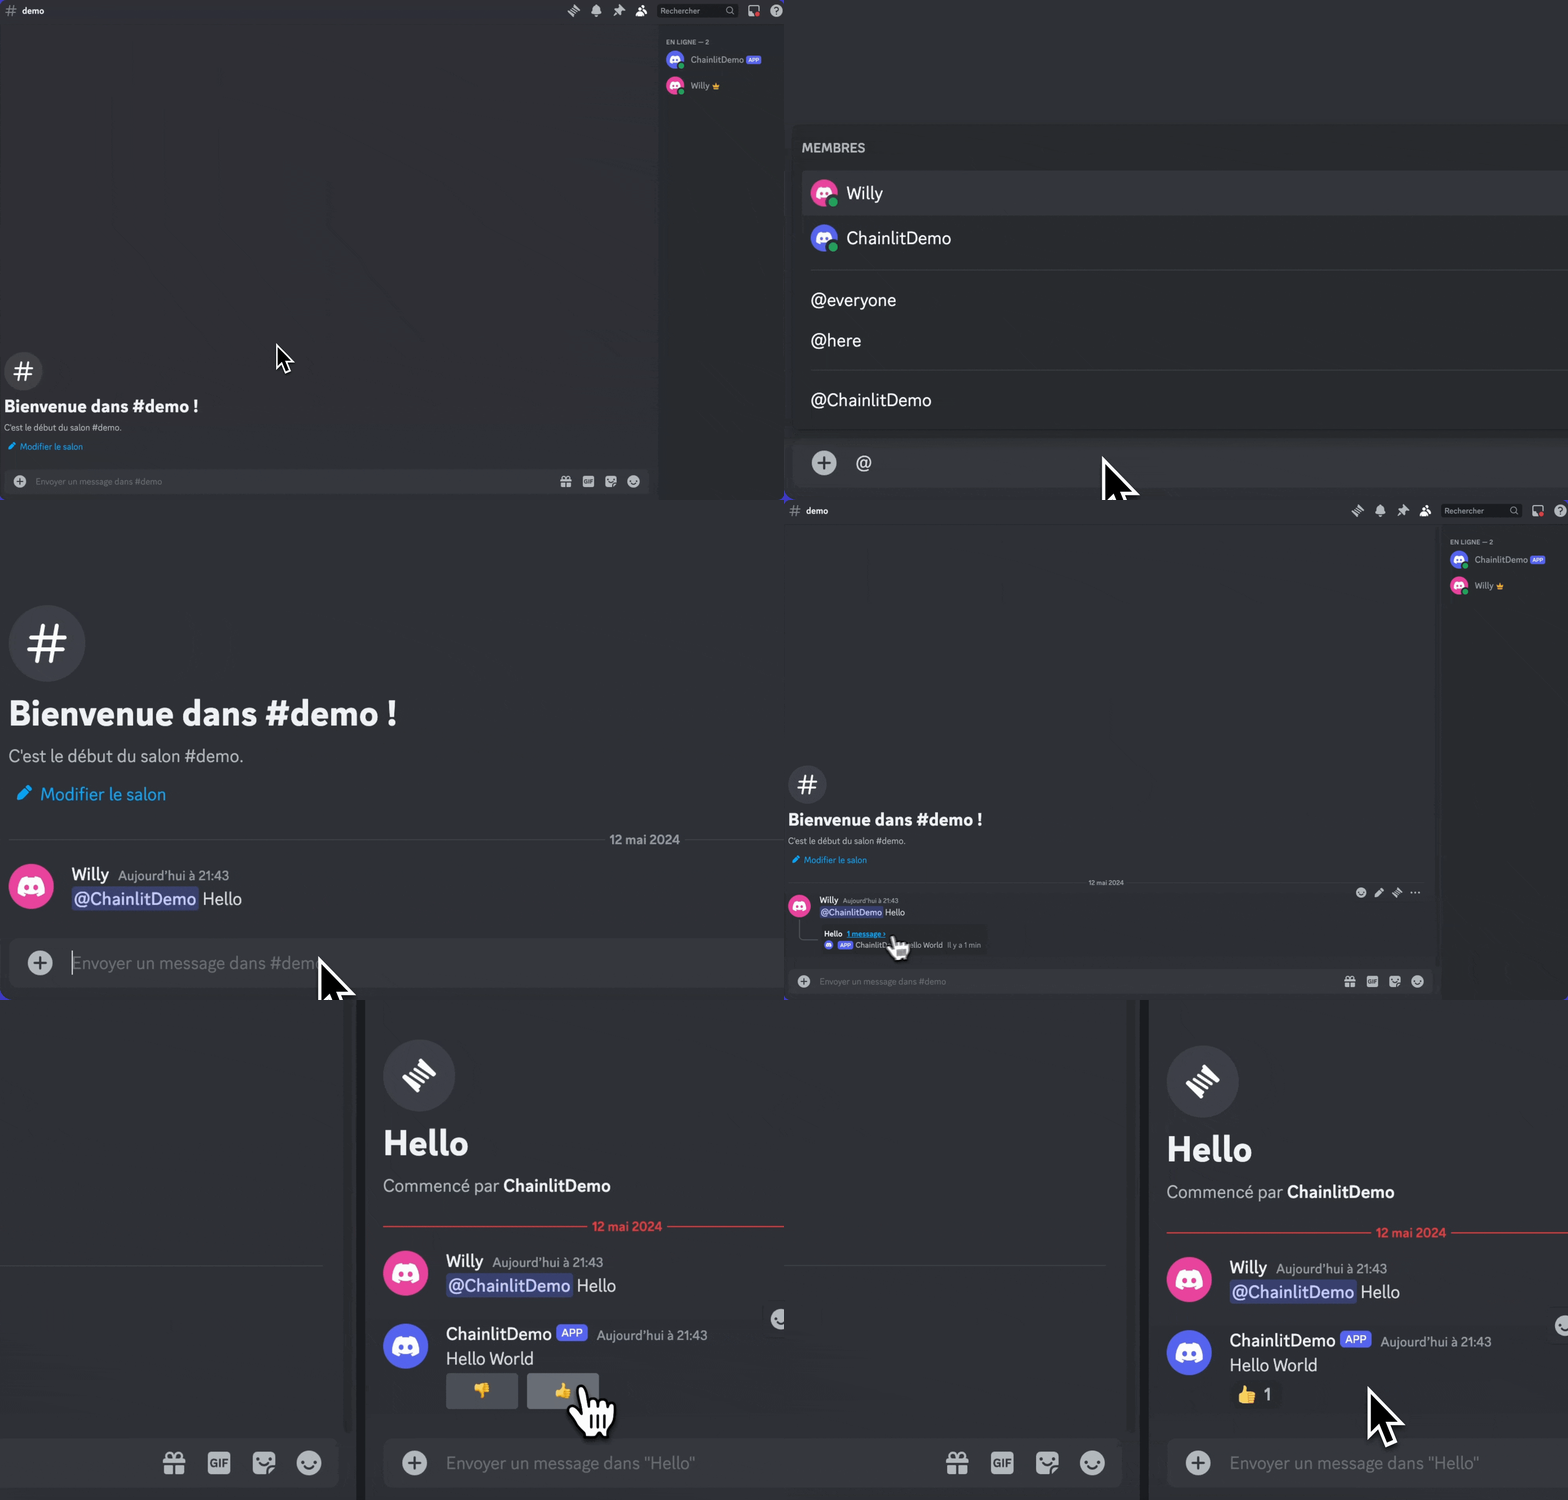
The Discord bot will listen to messages mentioning it in channels and direct messages.
It will send replies to a dedicated thread or DM depending on the context.
 ## Supported Features
| Message | Streaming | Elements | Audio | Ask User | Chat History | Chat Profiles | Feedback |
| ------- | --------- | -------- | ----- | -------- | ------------ | ------------- | -------- |
| ✅ | ❌ | ✅ | ❌ | ❌ | ✅ | ❌ | ✅ |
## Install the Discord Library
The Discord library is not included in the Chainlit dependencies. You will have to install it manually.
```bash theme={null}
pip install discord
```
## Create a Discord App
To start, navigate to the [Discord apps dashboard](https://discord.com/developers/applications). Here, you should find a button that says New Application. When you click this button, select the option to create your app from scratch.
## Supported Features
| Message | Streaming | Elements | Audio | Ask User | Chat History | Chat Profiles | Feedback |
| ------- | --------- | -------- | ----- | -------- | ------------ | ------------- | -------- |
| ✅ | ❌ | ✅ | ❌ | ❌ | ✅ | ❌ | ✅ |
## Install the Discord Library
The Discord library is not included in the Chainlit dependencies. You will have to install it manually.
```bash theme={null}
pip install discord
```
## Create a Discord App
To start, navigate to the [Discord apps dashboard](https://discord.com/developers/applications). Here, you should find a button that says New Application. When you click this button, select the option to create your app from scratch.
 ## Set the Environment Variables
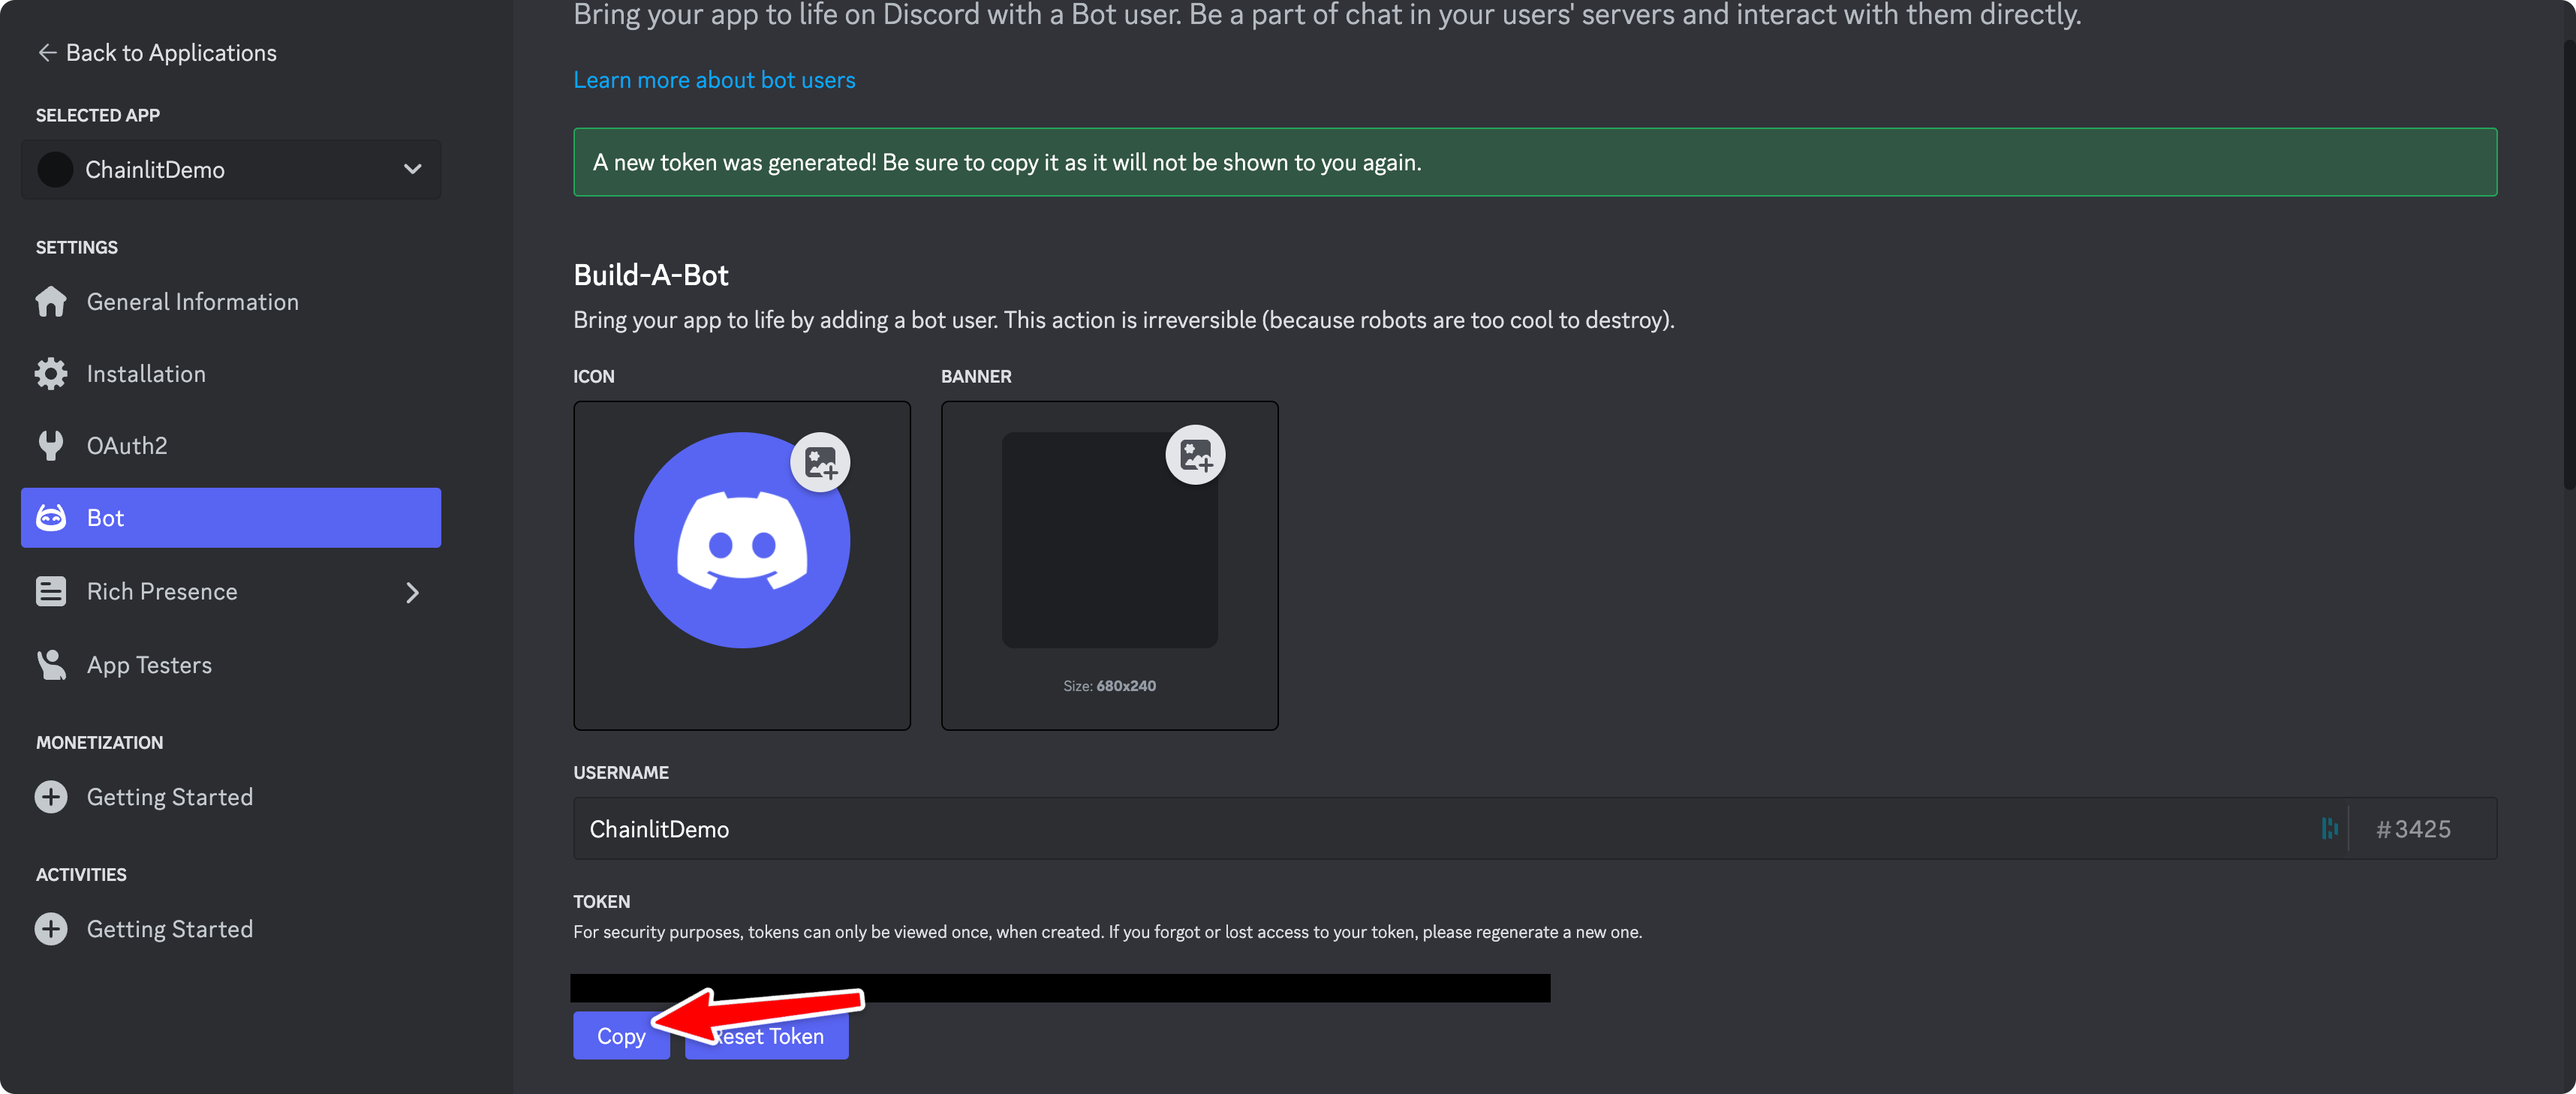
Navigate to the Bot tab and click on `Reset Token`. This will make the token visible. Copy it and set it as an environment variable in your Chainlit app.
## Set the Environment Variables
Navigate to the Bot tab and click on `Reset Token`. This will make the token visible. Copy it and set it as an environment variable in your Chainlit app.
 ```bash theme={null}
DISCORD_BOT_TOKEN=your_bot_token
```
## Set Intents
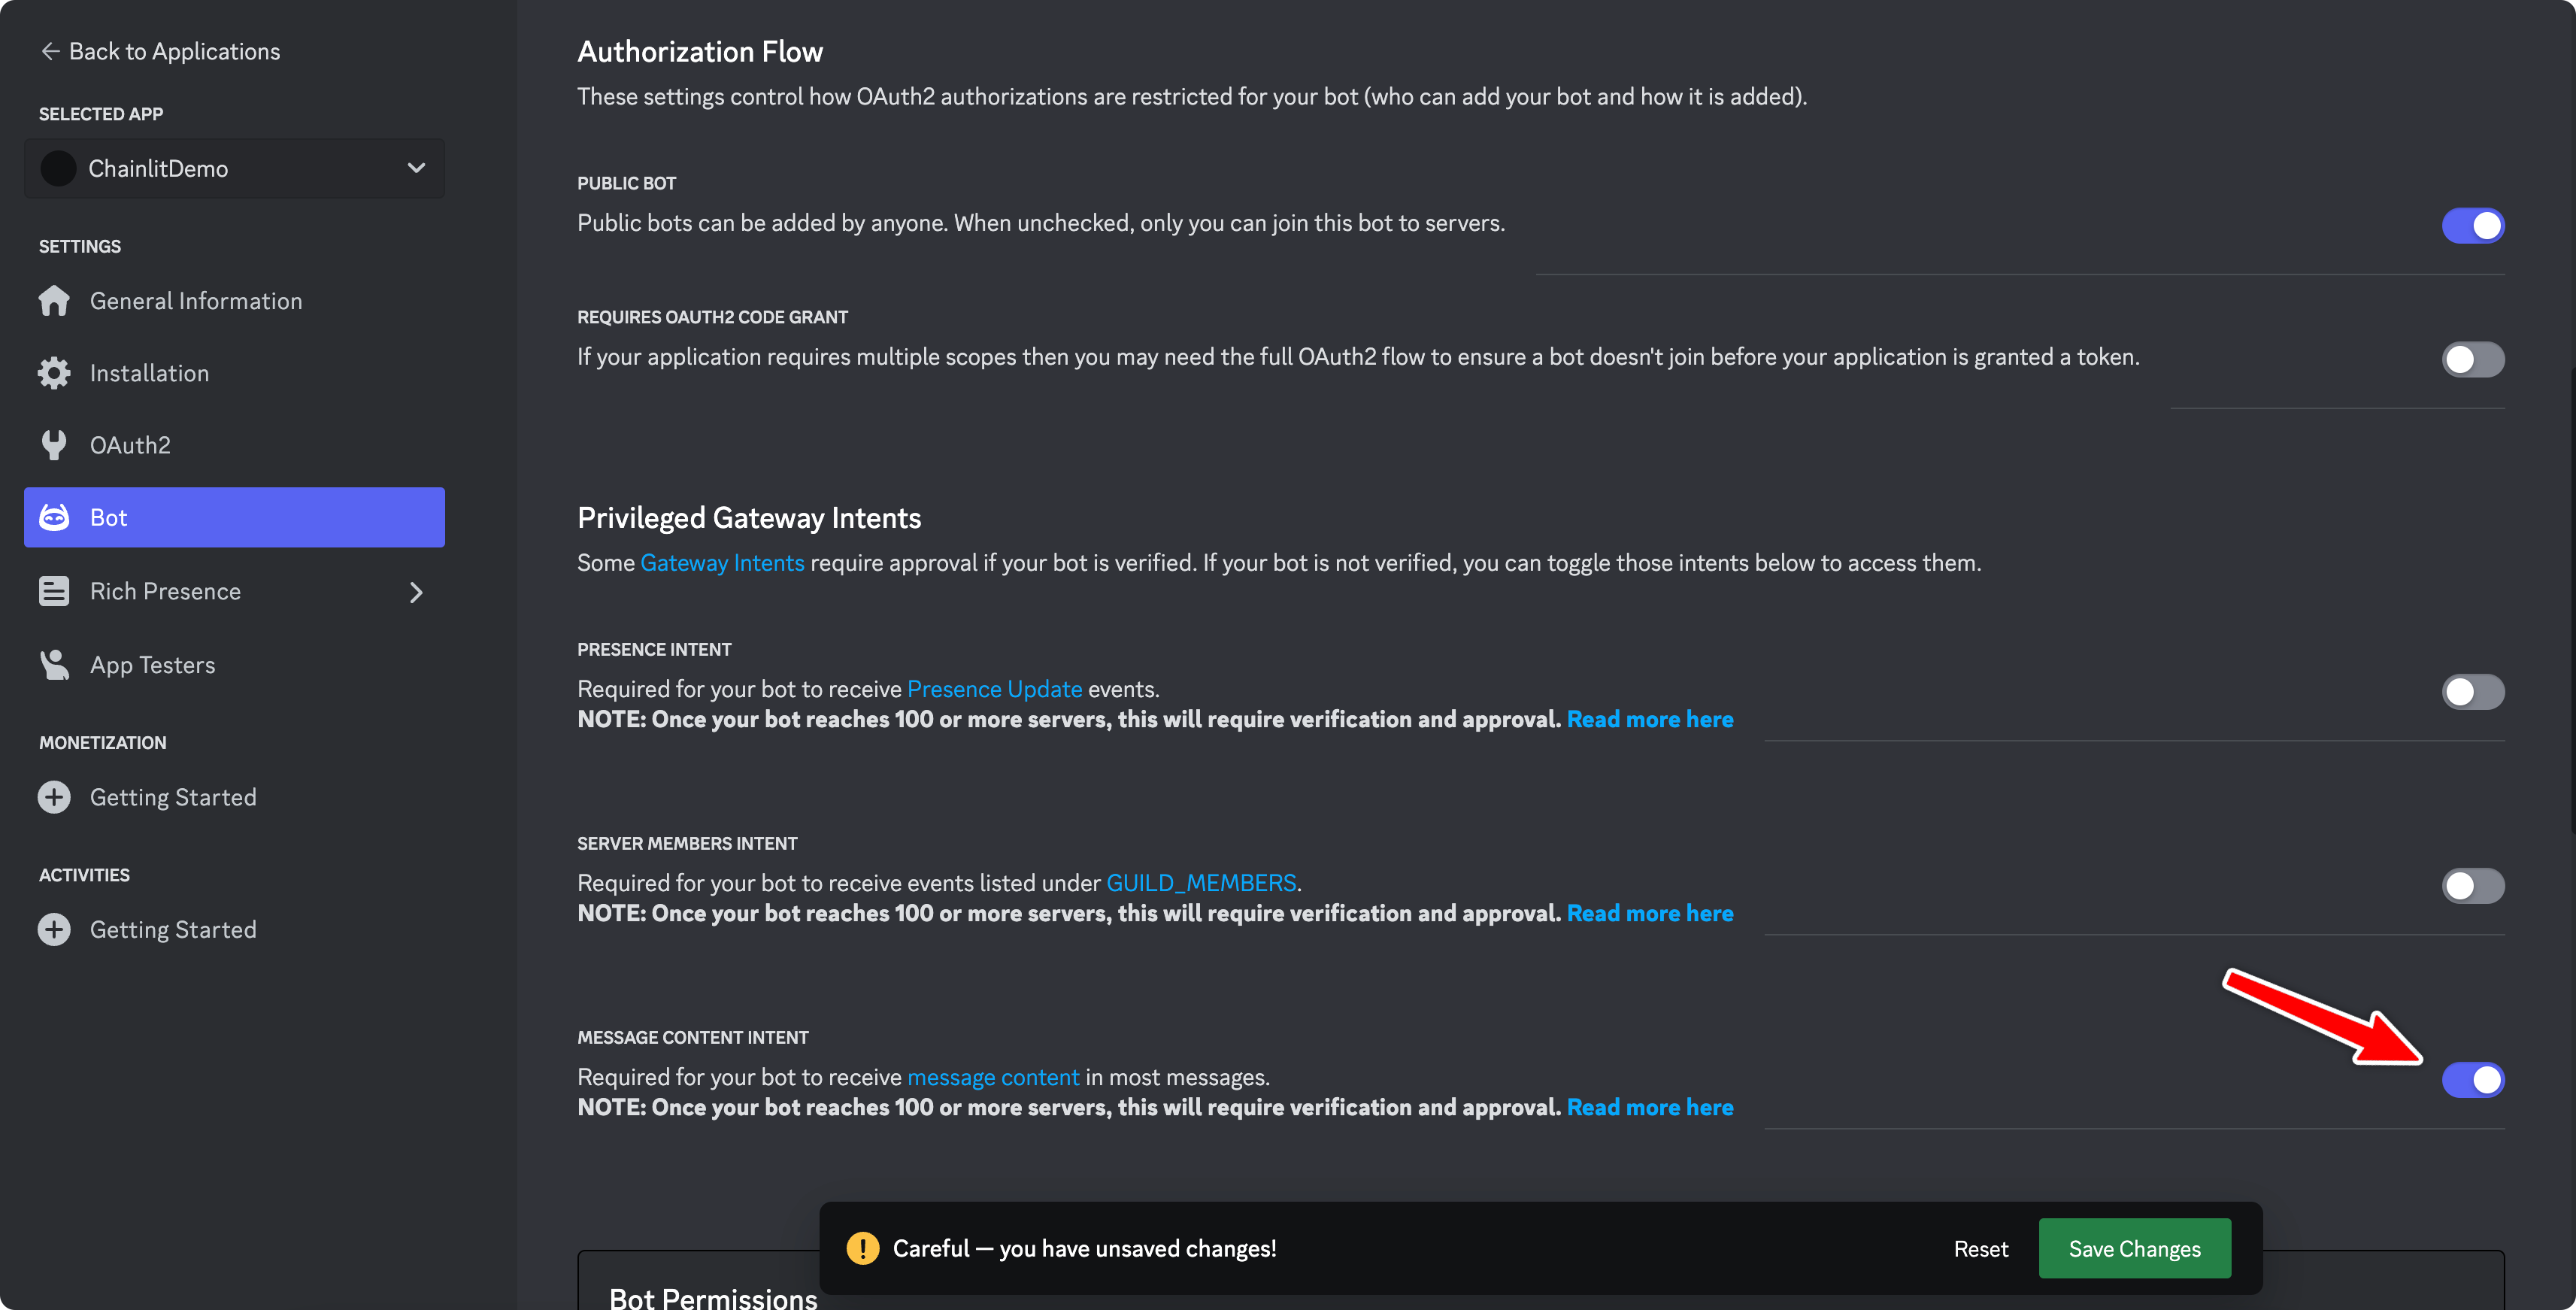
Navigate to the Bot tab and enable the `MESSAGE CONTENT INTENT`, then click on Save Changes.
```bash theme={null}
DISCORD_BOT_TOKEN=your_bot_token
```
## Set Intents
Navigate to the Bot tab and enable the `MESSAGE CONTENT INTENT`, then click on Save Changes.
 ## Working Locally
If you are working locally, you will have to expose your local Chainlit app to the internet to receive incoming messages to Discord. You can use [ngrok](https://ngrok.com/) for this.
```bash theme={null}
ngrok http 8000
```
## Start the Chainlit App
Since the Chainlit app is not running, the Discord bot will not be able to communicate with it.
For the example, we will use this simple app:
```python my_app.py theme={null}
import chainlit as cl
@cl.on_message
async def on_message(msg: cl.Message):
# Access the original discord message
print(cl.user_session.get("discord_message"))
# Access the discord user
print(cl.user_session.get("user"))
# Access potential attached files
attached_files = msg.elements
await cl.Message(content="Hello World").send()
```
Start the Chainlit app.
Using -h to not open the default Chainlit UI since we are using Discord.
```bash theme={null}
chainlit run my_app.py -h
```
## Install the Discord Bot to Your Workspace
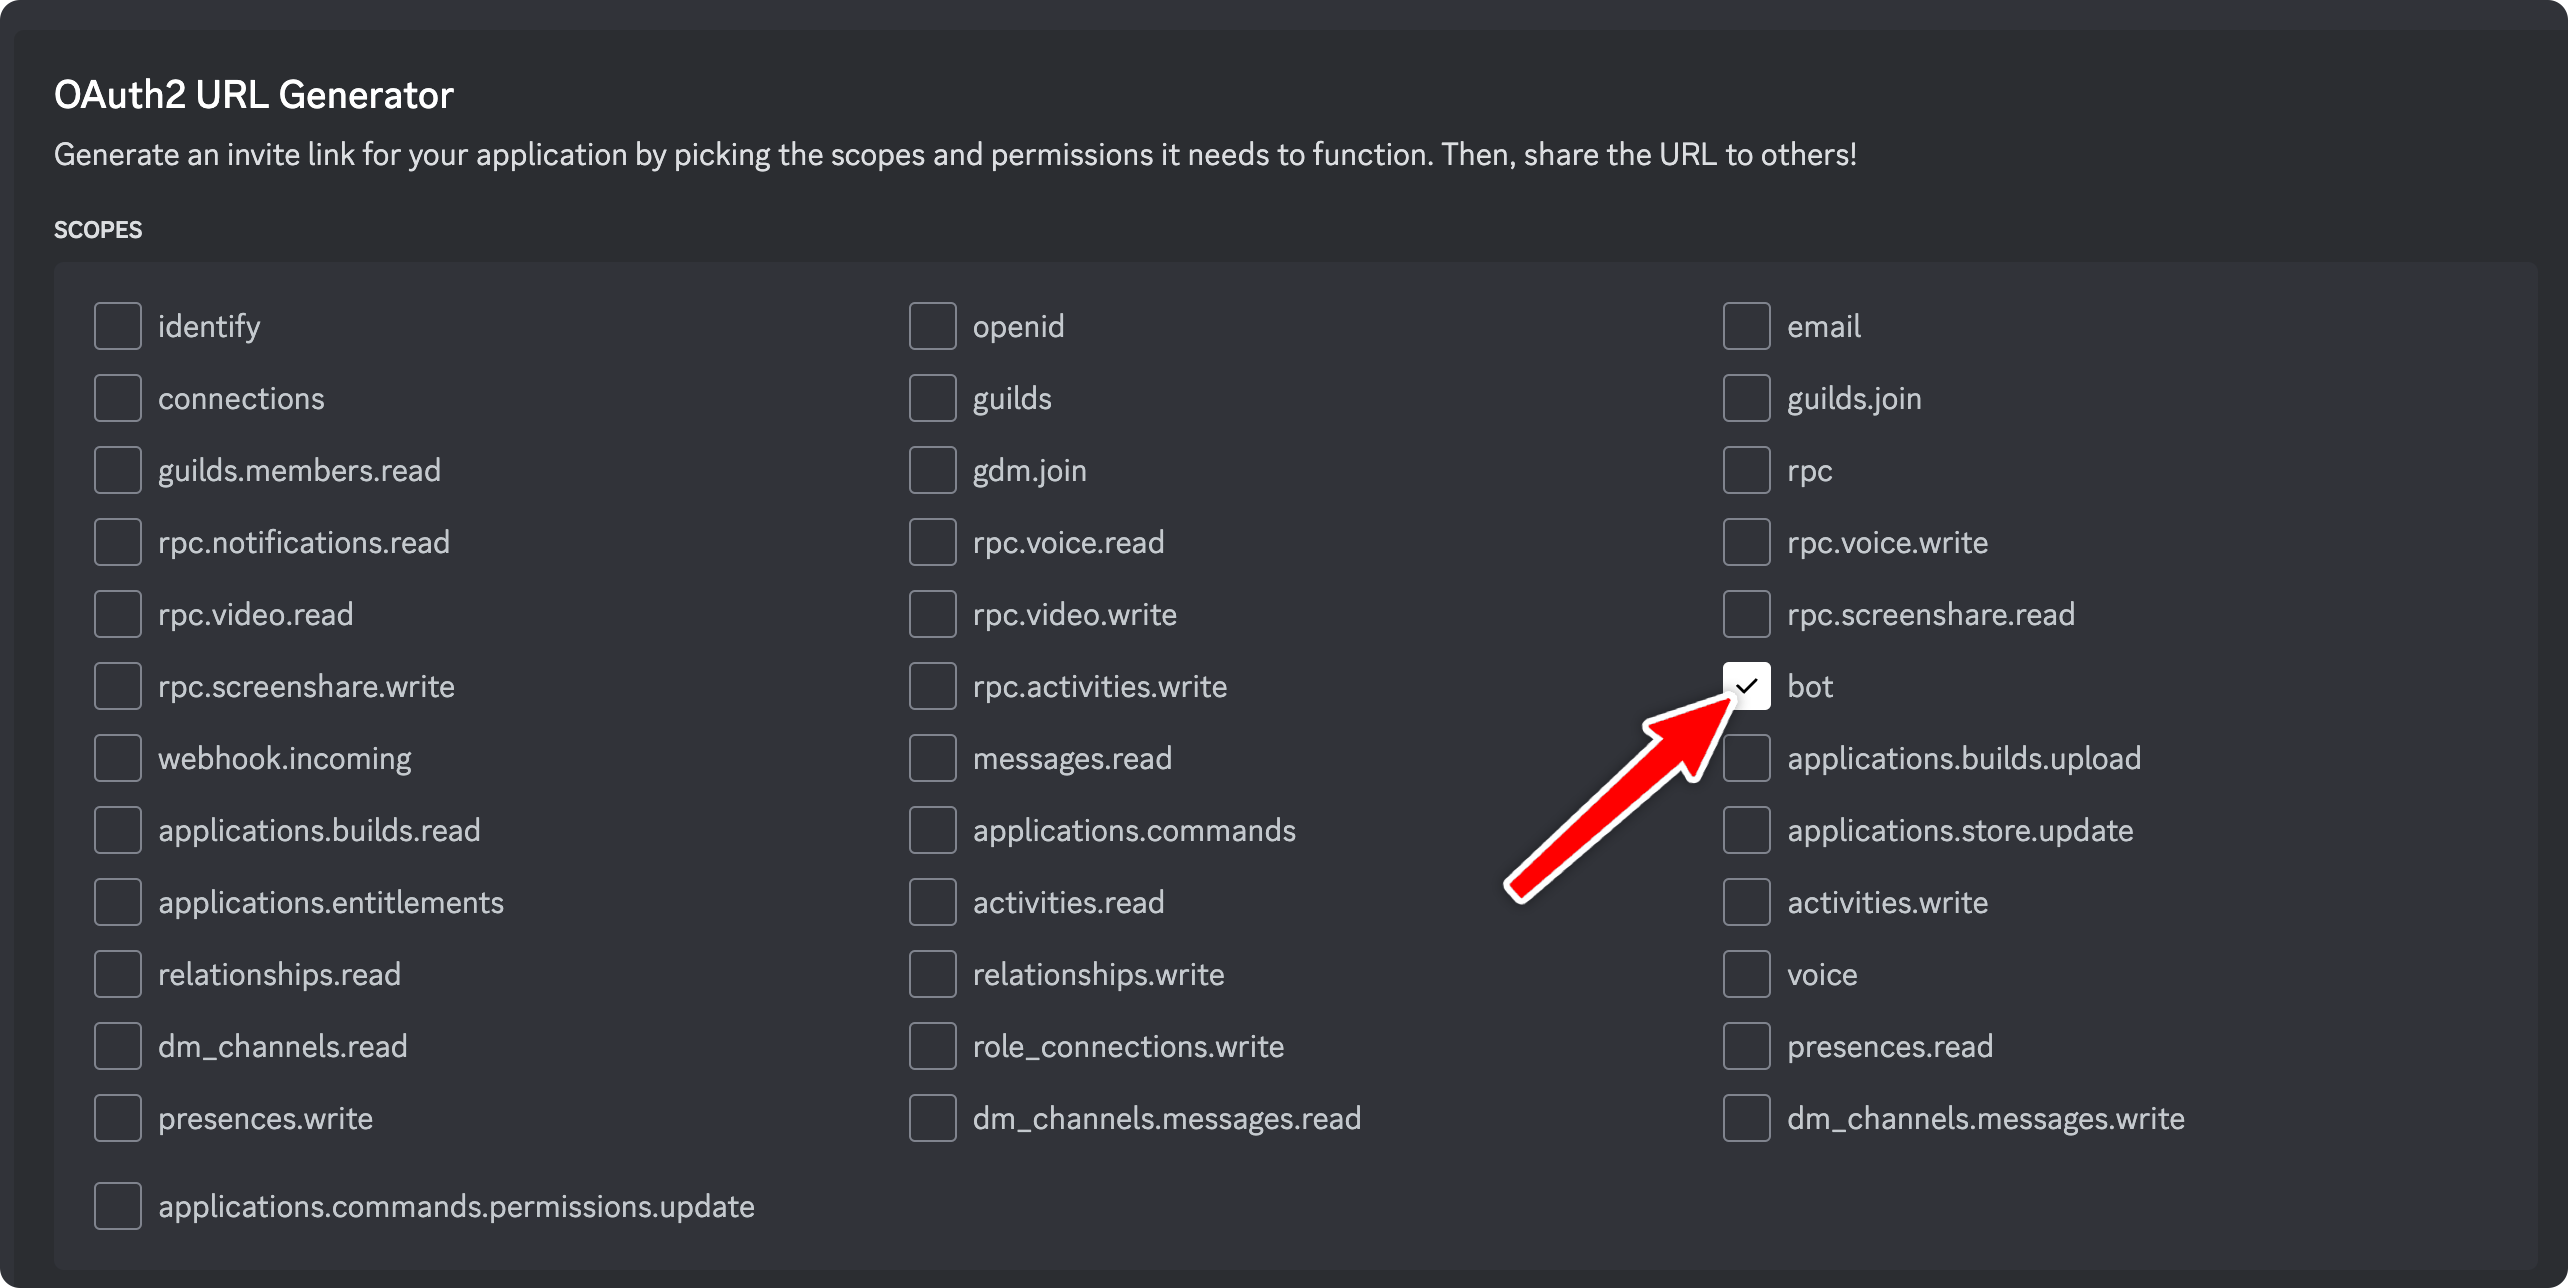
Navigate to the OAuth2 tab. In the OAuth2 URL Generator, select the `bot` scope.
## Working Locally
If you are working locally, you will have to expose your local Chainlit app to the internet to receive incoming messages to Discord. You can use [ngrok](https://ngrok.com/) for this.
```bash theme={null}
ngrok http 8000
```
## Start the Chainlit App
Since the Chainlit app is not running, the Discord bot will not be able to communicate with it.
For the example, we will use this simple app:
```python my_app.py theme={null}
import chainlit as cl
@cl.on_message
async def on_message(msg: cl.Message):
# Access the original discord message
print(cl.user_session.get("discord_message"))
# Access the discord user
print(cl.user_session.get("user"))
# Access potential attached files
attached_files = msg.elements
await cl.Message(content="Hello World").send()
```
Start the Chainlit app.
Using -h to not open the default Chainlit UI since we are using Discord.
```bash theme={null}
chainlit run my_app.py -h
```
## Install the Discord Bot to Your Workspace
Navigate to the OAuth2 tab. In the OAuth2 URL Generator, select the `bot` scope.
 Then, in the Bot Permissions section, select the following permissions.
You can check that you have selected the right permissions by looking at the
number of permissions parameter of the URL. It should be `377957238848`.
Then, in the Bot Permissions section, select the following permissions.
You can check that you have selected the right permissions by looking at the
number of permissions parameter of the URL. It should be `377957238848`.
 Copy the generated URL and paste it in your browser. You will be prompted to add the bot to a server. Select the server you want to add the bot to.
That's it! You should now be able to interact with your Chainlit app through Discord.
## Chat History
Chat history is directly available through discord.
```python theme={null}
from chainlit.discord.app import client as discord_client
import chainlit as cl
import discord
@cl.on_message
async def on_message(msg: cl.Message):
# The user session resets on every Discord message.
# So we add previous chat messages manually.
messages = cl.user_session.get("messages", [])
channel: discord.abc.MessageableChannel = cl.user_session.get("discord_channel")
if channel:
cl.user_session.get("messages")
discord_messages = [message async for message in channel.history(limit=10)]
# Go through last 10 messages and remove the current message.
for x in discord_messages[::-1][:-1]:
messages.append({
"role": "assistant" if x.author.name == discord_client.user.name else "user",
"content": x.clean_content if x.clean_content else x.channel.name # first message is empty
})
# Your code here
```
Copy the generated URL and paste it in your browser. You will be prompted to add the bot to a server. Select the server you want to add the bot to.
That's it! You should now be able to interact with your Chainlit app through Discord.
## Chat History
Chat history is directly available through discord.
```python theme={null}
from chainlit.discord.app import client as discord_client
import chainlit as cl
import discord
@cl.on_message
async def on_message(msg: cl.Message):
# The user session resets on every Discord message.
# So we add previous chat messages manually.
messages = cl.user_session.get("messages", [])
channel: discord.abc.MessageableChannel = cl.user_session.get("discord_channel")
if channel:
cl.user_session.get("messages")
discord_messages = [message async for message in channel.history(limit=10)]
# Go through last 10 messages and remove the current message.
for x in discord_messages[::-1][:-1]:
messages.append({
"role": "assistant" if x.author.name == discord_client.user.name else "user",
"content": x.clean_content if x.clean_content else x.channel.name # first message is empty
})
# Your code here
```